12d MODEL SOFTWARE TIPS
A growing collection of tips for streamlining your use of 12d Model. Some of these have been developed by EXDS and others by our innovative community of users.
If you have a tip, trick or shortcut you’d like to share, let us know here – and of course we’ll give you full credit.
Also check out the 12d Wiki for more tips and workflow information covering all areas of 12d Model Software.

Create square off lines for boundaries using PGUP and PGDN
When you’re entering cadastral lots into 12d Model, it’s easy to create a line square off the last one. The screen shot shows the bearing of the line just created, and the panel shows the bearing of the line. Add or subtract 90 degrees in the panel by pressing the PGUP or PGDN buttons on your keyboard.
Page Up will add 90 degrees to the bearing shown in the panel, and Page Down will subtract 90 degrees.
………………………………………………………………………………………………………………………………………………………………………………………………………
Convert feet to metres during cadastral entry 

12d Model has a built in converter between feet and m. When entering old cadastral plans you don’t need to go to the trouble of converting distances before you start, you simply enter the distance in feet, followed by a lowercase f. In the example shown, the surveyor has entered 233f and the length of the line will be 81.077m
………………………………………………………………………………………………………………………………………………………………………………………………………
Transfer Models

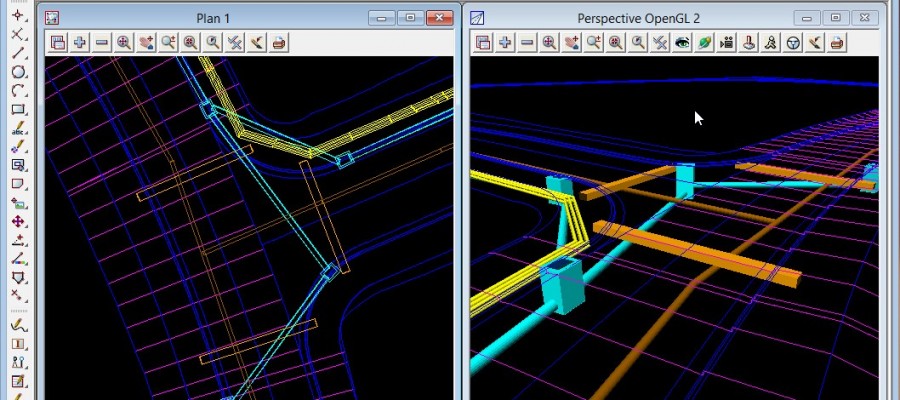
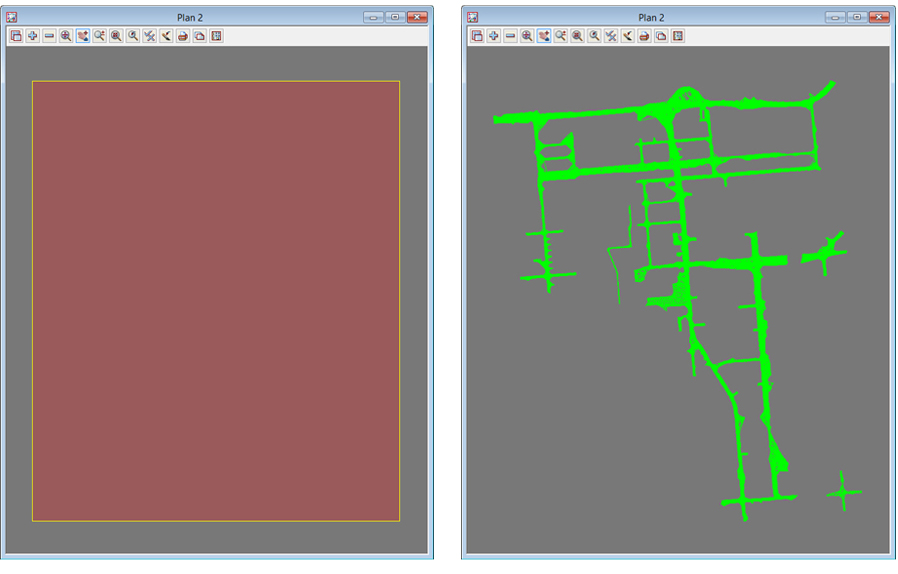
There are times when you need to transfer all of the models visible from one view onto another view. Typically you would want to have all of your design strings that are on a Plan, to be displayed in Perspective. This is easily done using View=>Model Transfer (see image at right). Simply pick the view where the data is displayed, then the view where you want to see it, and the models will be displayed in the new view.
………………………………………………………………………………………………………………………………………………………………………………………………………
Send tins and rasters to the back

The draw order in 12d Model is determined by the order that you add data to the view. If you add a tin or an aerial photograph onto a view that contains design strings, everything will be hidden. A single command can be used to send all tin and all raster images to the ‘back’ on all views – so that you can see your design with the tin or the aerial in the background. ‘View =>Tin/raster to back’ will do the job for you.
………………………………………………………………………………………………………………………………………………………………………………………………………
View new data
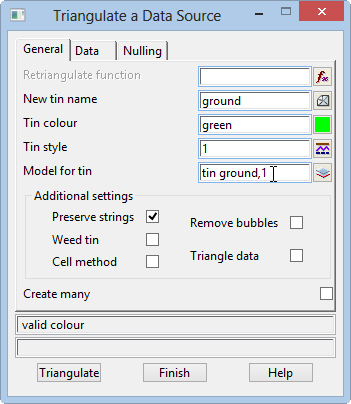
12d Model typically runs with a number of different views open, so an option that creates strings, text or a tin will not automatically show you that data – it doesn’t know the view you want to see it in.
But you can tell it.
If you type or pick a model name, then add a comma and the view name, the new data will be added to the view you nominate.
In the image at right, a new tin is about to be created. The tin will be in the ‘tin ground’ model, and that model will be added to view ‘1’
………………………………………………………………………………………………………………………………………………………………………………………………………
Control what you see when you read data into 12d Model
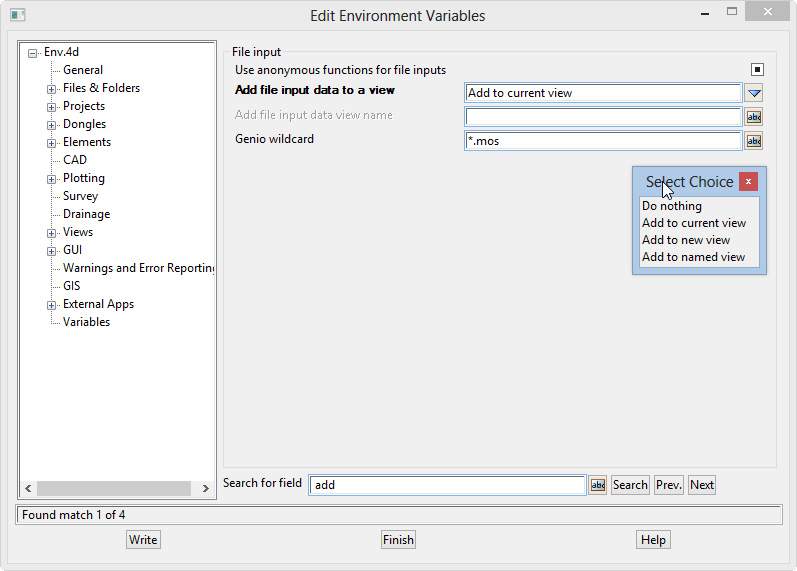
When you import a file into 12d Model, 12d will create a new view and add the data to that view. You may not know that you have a choice: You can let 12d do it’s thing, or you can have the new data added to the active view (the one you last clicked in), or you can have it do nothing or you can even have it added to an existing named view.
It’s all controlled with a setting in the environment file. Open the env editor (Project >Management >env.4d) and search for ‘add’. The line to edit is ‘Add file input data to view’.
………………………………………………………………………………………………………………………………………………………………………………………………………
Nulling triangles by Polygon
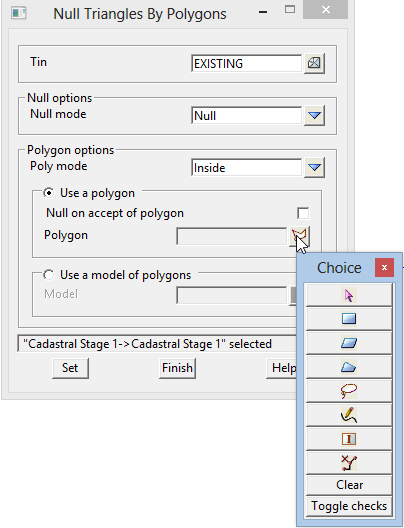
If you are used to nulling triangles by drafting a freehand rectangle on the screen, then you might be stumped by the new ‘Null Triangles by Polygon’ panel.
The default pick method is the pink arrow, which will let you choose an existing polygon. But it’s a hassle to draft the rectangle first, then to pick it… right? The trick is to right click on the arrow to open the ‘Choice’ menu, then choose your weapon of choice.
You can draft a (temporary) rectangle, parallelogram, trapezoid, or lasso. And for added value you can pick an existing polygon, then edit or delete it.
‘Toggle checks’ will turn off self checking of the polygon before processing. (This kills the ‘Bad Poly’ message).
You will find a similar ‘Choice’ menu under your Right Mouse button everywhere you see the polygon/lasso button (left).
………………………………………………………………………………………………………………………………………………………………………………………………………
Remove models by pick
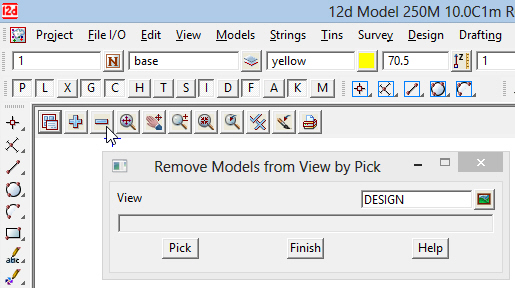
It’s easy to remove models from a view, even if you’re not sure of the model name. Simple RIGHT CLICK on the ‘-’ button for the view. ‘Remove models from view by pick’ opens, and you simply pick models from the view to remove them.
………………………………………………………………………………………………………………………………………………………………………………………………………
View Manager
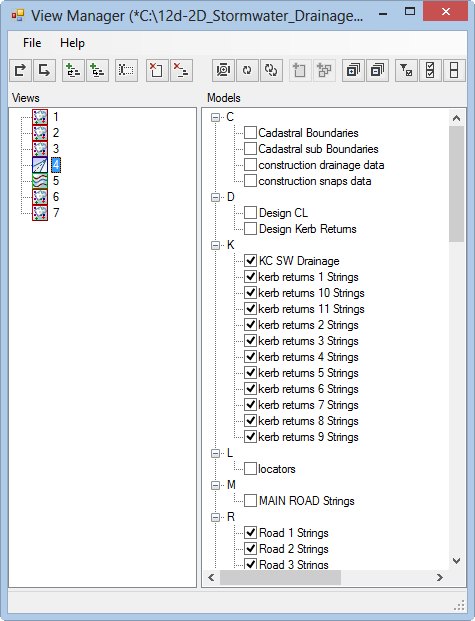
Most people know that TMR in Queensland use 12d Model for their survey and design work. Many people aren’t aware that TMR have developed a suite of uber-useful tools for 12d Model.
View Manager is part of the TMR Customisation of 12d Model (go to TMR website and search for ‘12d Model customisation’). The View Manager and instructions for use and installation are part of the customisation.
View Manager makes it easy to control what and where data is displayed in 12d Model. It gives you a list of views, shows you which models are on the view, allows you to remove and add models, and much more. You can invert the list (show models that are NOT turned on) create and rename views, delete views — and go to lunch early.
………………………………………………………………………………………………………………………………………………………………………………………………………
Keyboard Shortcuts
Quick links to tools that you use all the time. 12d Model comes with keyboard shortcuts already loaded. Most people know that F2 gives a ‘String=>Inquire’ and that F3 / F4 will toggle point and line snap.
Other shortcuts that we find useful are F6 for ‘String Edit’ and F11 for Tin Settings (setting contour colour and interval for view contours).
………………………………………………………………………………………………………………………………………………………………………………………………………
Hover + type letter to get model shortlist
The list of models in a project can quickly get very long, and it can become difficult to find a model in the list. If you know the first letter of the model name, you can hover your mouse over the + or – button, and press that letter on the keyboard. A list will pop up that has only the models that start with that letter.
……………………………………………………………………………………………………………………………………………………………………………………………………….
What’s under the Red Carpet
We’ve all seen the red data square that 12d introduced with V10. You know… the one that represents a load of data and is super quick to refresh. It was put into the program when point cloud data became common, and works really well with those big data sets. Sometimes though, you just want to see what’s hidden under the red carpet.
The command you need is under the Project menu. It’s Project>Management >Toggle Density Drawing. Sure, there is an environment variable that will disable the Density Drawing, but if you go that route then you lose it for all of your projects – even the ones that really need it. And where is the environment variable you ask? Open the env editor (Project >Management >env.4d) and search for ‘density’. It’s a snap…
……………………………………………………………………………………………………………………………………………………………………………………………………….
Don’t know where to look for something?
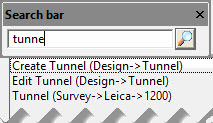
Sure, 12d is a big suite… dealing with everything civil and surveying means there are many many commands in there. But 12d has a handy toolbar that can be used to search for keywords for menu and toolbar items.
It’s called ‘Search bar’ and can be turned on via View > Toolbars. We suggest that you dock that to some free screen space. Once its docked you can simply type any keyword you like to see what options there are. It works with both the factory- and user-defined menus and toolbars. The menu path is shown and selecting the item launches the relevant command. Hat tip to Ed Wilson, SKM
……………………………………………………………………………………………………………………………………………………………………………………………………….
AutoCAD Colours in 12d Model
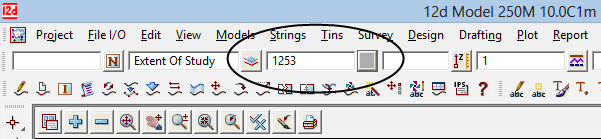
Many people use AutoCAD alongside 12d Model, and it’s smart to use colours in 12d that will translate correctly to CAD. What you might not know is that all of the AutoCAD colours are available inside 12d Model, the colour is 1000+ the AutoCAD colour that you want. For example if you want AutoCAD colour 254, then simply type in 1254 into the colour box. Colour 254 will display, and will be correctly exported to CAD.
……………………………………………………………………………………………………………………………………………………………………………………………………….
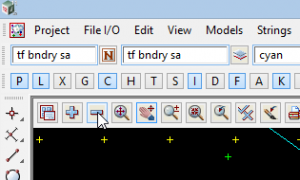
Auto fill on 12d Panels
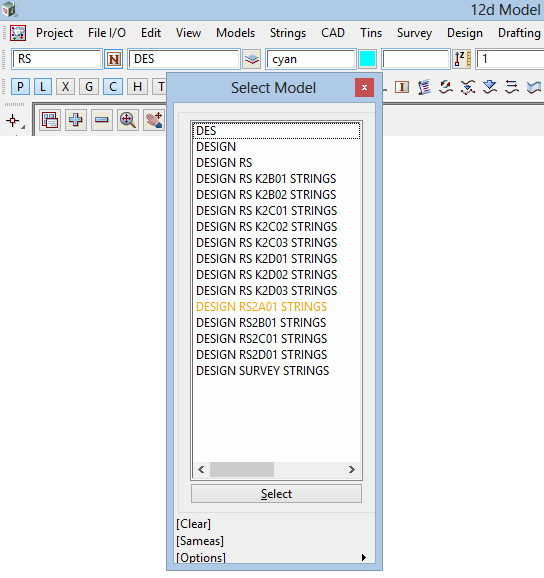
Auto fill saves you typing. It’s easy to use, the key is to start typing then to press ‘CTRL-D’ together
For example, start typing the name of a Model, press ‘CTRL-D’ and 12d pops up a list of models that start with those characters.
In the example shown, we want to draft new strings in the model ‘DES RS K2B01 STRINGS’. We simply type ‘DES’ into the Model field in the CAD Control bar, and press ‘CTRL-D’. The list of models that start with DES is shown, and you can easily select the one you want.
The technique can be used for selecting a name, colour, or linestyle, and it works in any panel.
……………………………………………………………………………………………………………………………………………………………………………………………………….
‘Same As’
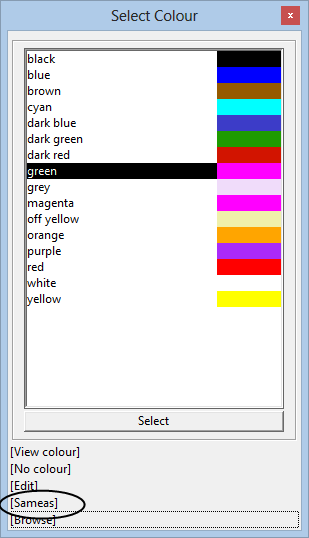
Most of the 12d Model choice boxes have a [Sameas] option at the bottom. If you want to draft in the same colour as a line on the screen, choose [Sameas] from the colour list then choose the line from the screen.
[Sameas] works for names, models, colours and linestyles.
………………………………………………………………………………………………………………………………………………………………………………………………………