Create Rural Template
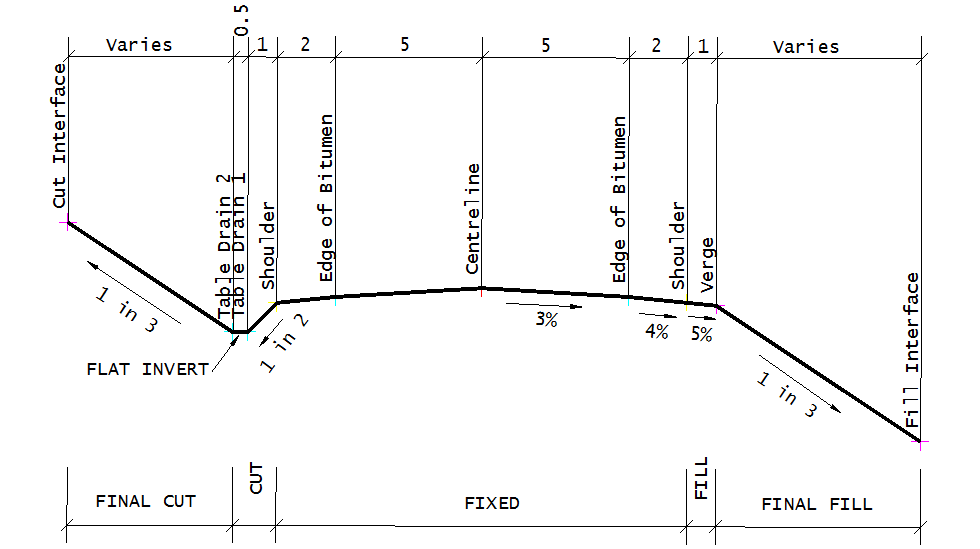
Typical cross section for road design The second part of Road Design in 12d Model is the creation of the Design Cross Section, or Template. As will be discussed in-line with Appendix A – Geometric Road Design. The Cross Section is the Vertical plane at right angles to the longitudinal road axis. The Cross Section has a number of features including, Traffic Lanes, Shoulder and Verge areas, The Traffic lanes provide adequate space for travel, the number is usually determined by AADT volumes and the lane width affects the roads capacity for traffic. The Shoulder is provided for safety, allowing some wandering (recovery), emergency stopping and protection of the edge of pavement. Typical Cross sections are produced on all projects to show the selected elements to be constructed, widths, and slopes and cross falls to be adopted and pavement depths for construction.
A typical road cross section is shown below. |
|
Creating a template - cross section for a road design The template is created using: Design => Templates => Create/Edit.
There are four parts to the template:
Final Cut/Fill. After 12d Model completes any instructions in the CUT or the FILL parts of the template, it tests to see if the last point on the cross section (either the verge point or the table drain 2 point in this case) is in CUT or FILL, then carries out the instructions in the ‘Final Cut/Fill’ part of the template. |
|
|
Type in the template name Rural Press the Fixed button to display the Fixed Template panel. |
|
Type in the template values for the design cross section. The Draw button allows users to have the fixed part of the template displayed, and you are able to check the link values that have been entered. Press Apply to save the Fixed template values. Press Draw to refresh the diagram of the design links. Press Finish to exit and finish the panel without saving. Press OK to save and finish the panel. |
Notes:
You can define the level of each point by height OR crossfall BUT NOT BOTH. |
|
Create the cut part of the template
The Cut part of the template will be joined to the last link in the fixed part of the template which is the SH – Shoulder string. |
Press the Cut button to display the Variable Cut Template panel. Type in the template values for the design cross section. Press Apply to save the Cut template values. Press Draw to refresh the diagram of the design links. Press Finish to exit and finish the panel without saving. |
Notes:
|
|
|
Press the Final Cut/Fill button to display the Variable Fixed Template panel. Type in the template values for the design cross section. Press Apply to save the Final Cut / Fill template values. Press Finish to exit and finish the panel without saving. |
Notes:
|
|